apex 3030 repeater 3d models
19927 3d models found related to apex 3030 repeater.
thingiverse
Move carriage around and re measure, repeat until square. Once all is good tighten down the locknuts on the back of the belt tension to keep unit secure. Wrap uncut /unused belt around belt tension, tie off with ziptie to secure it. Move carriage...
thingiverse
Repeat until the flat top of the dome-shaped part sits flush with the rim of the outer mold, and can't be pressed down further, no matter how hard you try. - Now, the second phase begins. Hold the dome-shaped part in place and sprinkle SiC paste all...
prusaprinters
Repeat step 12 to verify that the connections are solid.Move the USB cable so that ~ 2-4cm of the cable with all its protective layers are inside the bottom part. Use hot glue on this area of the cable to fix the cable to the bottom. Be sure that no...
prusaprinters
Do the same for the Body “Right”. Repeat the same for the bodies “Clamp 1” and “Clamp 2”. Repeat the same for the body “TPU Stripe”. Optionally do the same for “Bolts” - you probably won't need them, they are for holding the clamps in place in case...
prusaprinters
Whatever you choose, do realize that you will be repeatedly whacking it with a sledgehammer, so make sure its sturdy!InstructionsPreparing the stampsSadly, all the cheap stamps have a problem, in that they are not ground “truly parallel”, and tend...
prusaprinters
I also made an exploded view drawing to help with assembly.Build can also be found on Thingiverse.Purchase Parts:QTY 12 - 20x6x2mm magnets (used to secure the doors from unwanted sliding and opening)QTY 8 - 6x50mm wood screws (used to mount the...
myminifactory
Place your bauble on a sheet of paper Apply glue to the area you'd like to glitter - if working with multiple colors, glue one color at a time Sprinkle a generous amount of glitter on the glued area Collect up any excess glitter by folding the paper...
thingiverse
*Build can also be found on [PrusaPrinters](https://www.prusaprinters.org/prints/68735-prusa-slack-lack-enclosure)* --- **Purchase Parts:** * QTY 12 - 20x6x2mm magnets (used to secure the doors from unwanted sliding and opening) * QTY 8 - 6x50mm...
prusaprinters
A tiny splinter lifted from the grain will create greater inaccuracy than that, BUT it does work and enabled me to quickly make repeated cuts within ± .05 (a 0.1mm range) was impressive. ... NOTE that this was with a very short sample piece on a well...
myminifactory
Project ContentsGeneral InformationSo far this set includes regular bench dogs, stop dogs with a flat side, corner dogs with a 90° open corner, angle dogs with a 90° top angle, flat stops, corner stops, repeat stops, planing stops and a cam clamp. I...
prusaprinters
Just check my uploads and find the set you'll need.This is the 19.9mm set for 20mm dogholes.If you need any other types of bench dogs / stops / clamps, need some different dimensions, have some neat ideas or the like then drop a comment and I'll see...
prusaprinters
Just check my uploads and find the set you'll need.This is the 20.0mm set for 20mm dogholes.If you need any other types of bench dogs / stops / clamps, need some different dimensions, have some neat ideas or the like then drop a comment and I'll see...
thingiverse
Repeat this for the rest of the pieces. Once you are set to move on, it's time for the LEDs. Feel for the wire from the top right corner of the machine to factory led strip. When you have a good grip on it, gently pull away to the side of the...
prusaprinters
The front support must be flush with the front end of the base. WRIST REST ASSEMBLYSlot the two rest support pieces into the narrow, elongated holes in the base (left or right side) and press on the rest with the curved edge to the inside.You...
prusaprinters
Then repeat the process with clear water.If the tube you use is detachable, you can also put the dispenser into the dishwasher. Yet, to clean the tube as well, I recommend to additionally follow the above procedure as...
thingiverse
A highly rigid frame allows higher acceleration settings * use 2040 aluminium extrusion, corner joints are about 4 times more rigid than 2020 corner joints and 2-3 times more rigid than 3030 corner joints 6. **Maximise build volume for selected...
gambody
Various special mechanisms were introduced to ensure that the model has fully articulated elements in it: the sliding rails allow the antipersonnel laser cannons to extend from the hull, the upper heavy laser cannon turret rotates around the axis,...
thingiverse
* **Hero_5_Session_30_deg_apex.stl** * 30 degree Hero Session Mount. Camera Butter ND filter friendly (slides in with one on). sides are open. Optionally, you can print the session band to slide over it. I find using 2 of those holds it really well....
thingiverse
I may already have the one you need.It's really zero trouble, I can export configurations on my phone and send them over instantly.What sort of frames are supported?Classic designs from the Apex by ImpulseRC, to the Quadmula Siren, and to the Y6 by...
thingiverse
I may already have the one you need.It's really zero trouble, I can export configurations on my phone and send them over instantly.What sort of frames are supported?Classic designs from the Apex by ImpulseRC, to the Quadmula Siren, and to the Y6 by...
thingiverse
####**FRAME** [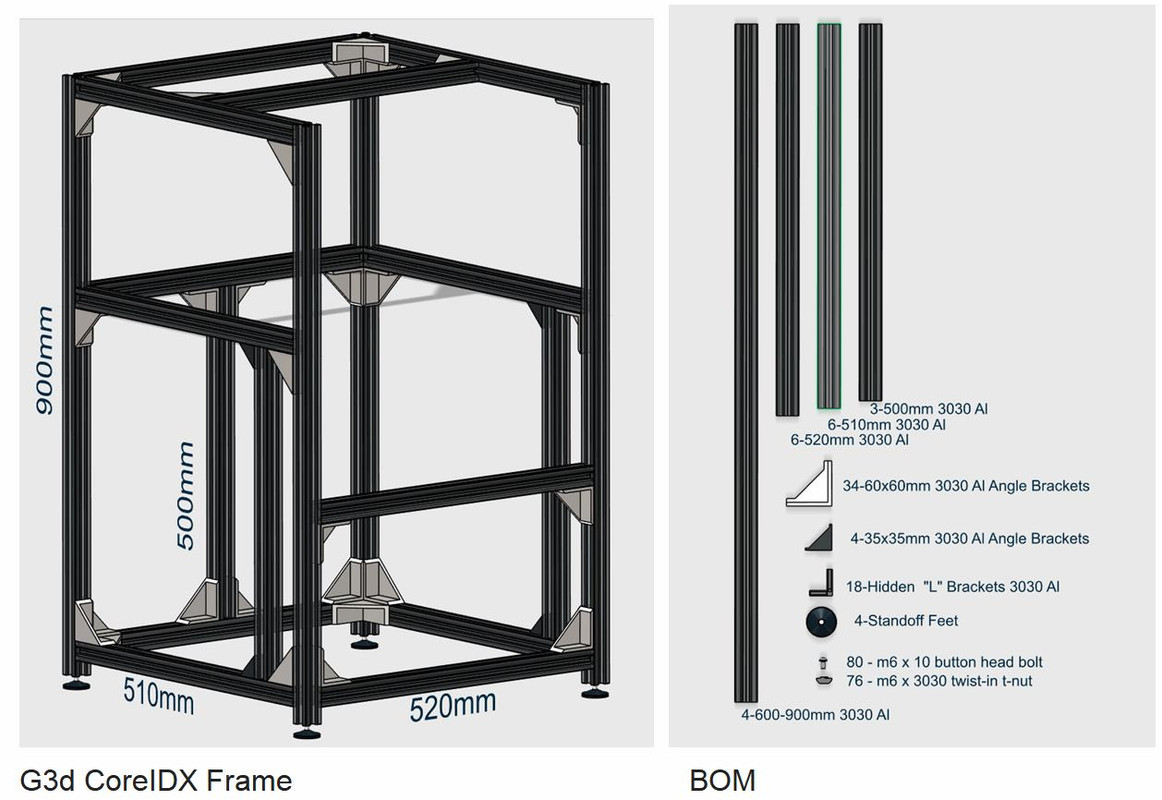](https://postimg.cc/Cny7M7tK) A HEVO Frame kit was used to build this system made up of 3030 Al extrusions. The outside dimensions are 580x570x900mm. The 900mm extrusions used...
thingiverse
Repeat for different altitudes if you like.Then consult the charts/tables as appropriate to use trial-and-error to dial in your estimate: your estimate of the latitude and date is correct if the altitude and bearing pairs, and/or altitude and...
thingiverse
Rotate the Frame Clockwise past the FrameStopper tab and repeat this process for the other two Sleds until the last StringReleaseHook's lower tab holds the entire frame in place against the tension of the TorsionSpring. (See the last video for more...
prusaprinters
Any comments and suggestions for improvements would be welcome. Edit 9-3-19: Added link to pen holders Added Link to Spindle Holder. Added Repeatability video Edit 9-6-19: The spindle Motor from Harbor Freight has a problem. The power is ok. The...
cults3d
Rotate the Frame Clockwise past the FrameStopper tab and repeat this process for the other two Sleds until the last StringReleaseHook's lower tab holds the entire frame in place against the tension of the TorsionSpring. (See the last video for more...
prusaprinters
It also is easily sandable.I spread it in a heavy layer while pushing it into the recesses.Its important to do this on the top and bottom halves while they are separate, you don't want to fill the gap between the top and bottom halves.Once its dry,...
thingiverse
When the previous step can be repeated successfully to your satisfaction, attach Main Shroud to printer carriage using two existing stock shroud screws 2. Attach stock fan to Main Shroud using stock fan screws 3. Attach Bullseye Fang to Main Shroud...
thingiverse
Repeat for the NewMediumChimeHolder and NewLargeChimeHolder. Do not glue the Cap to the top of the Stems yet. 11. At this point, you need to mount the assembly to your 3/4 plywood. Use the slotted holes at the back of the assembly and mount...
cults3d
I normally start with 280 and 320 wet sandpaper, and repeat this filling/sanding process with gradually finer sandpapers, 400 and finally 600, all used wet. If necessary, glazing putty can be used to fill in large voids. When satisfied with the...
cults3d
5.Repeat the process at the front, placing everything and leaving the wires well placed, taking advantage of bringing the wires further back towards the plate. 6.Place the front cover which also acts as a cover flange. 7.Check if you have left the...