anti z 3d models
94289 3d models found related to anti z.
prusaprinters
It is important that the live Z height is set so that the first layer is not squished excessively. The hemispheres and cores need to stay close to dimensions of the model for the core to fit just right inside of the hemispheres. A full set is 25...
prusaprinters
The letters E,F,I,J,P,T, and Z should also have supports, but they can be printed without if you don't mind clipping and sanding the messy first several layers of the unsupported areas where supports should be used. Of course, the letters on the...
prusaprinters
If you have the V6 Hemera you will need to firstly put all the rollers on and drill the holes with the x-carriage off the printer(step 4, 5, 7), then screw on the Hemera (step 6) and then slide this assembly onto the x-beam from the right by taking...
prusaprinters
You can probably scale the z axis to get the height you need. I printed with a 1mm brim to help them stick to the bed, then used a hobby knife to cut the brim off. I used PETG, but I suspect anything would work well enough.</p><p><strong>For the...
thingiverse
###Dual Letter Blocks Illusion Customizer This model was generated with my Dual Letter Blocks Illusion Customizer (the letter blocks were then scaled to 80% in the Z dimension). If you like this model but want to change something then try creating...
prusaprinters
There are also useful coat hangers and finger toys.Print instructionsYou can print it without any support, and it prints very fast.Standard settings will be fine, like infill of 20%, layer height of .2mm, 2 perimeters.After printing, turn the ring a...
prusaprinters
Kompletna lampa Led do akwarium morskiego lub słodkowodnego, jest to cały projekt lampy led w drugiej wersji V2 o mocy 350W z obudowa elektroniki oraz wszystkimi elementami, do lampy potrzebne są jeszcze:1 . Elementy ze sklepu Aquma:</p><ul><li><a...
cults3d
(ENT: "Rogue Planet") Lors de son 8ème anniversaire, son père lui offrit son premier livre d'astronomie "Le Cosmos de A à Z". Archer passa des heures à admirer la couverture qui présentait la Nébuleuse Arachnid. Quelques temps après, son père,...
thingiverse
- TODO -Refining of the printable housing -Make some design elements (ornament, product name string) -Make a replacement for the stock PSU The small stock transformer TS-4-4 (3VA) provides: -24V (up to 27V) AC -5V (2 * 2.5V) AC Power requierements:...
grabcad
A) Horizontal Axis Motor: This Rotates "Z" axis of 360 Degree. B) Vertical Axis Motor : This Rotates "Y" Axis Of 360 Degree.Nuclear Battery or MMRTG: This Generates energy in night if there is no sun light. This system i located in between the solar...
prusaprinters
In case your ring does not stick well during print, try the original fidget ring instead.After printing, turn the ring a few times to make it spin better. Ring size conversion table:Ring inner diameter in mmUSACanadaUnited...
prusaprinters
You can see the support in green in the picture below.The ring still prints very fast, in 30mins.Other standard settings will be fine, like infill of 20%, layer height of .2mm, 2 perimeters.After printing, remove the support material and turn the...
prusaprinters
The soundpost has to be placed vertically inside the violin (through the right f-hole), about a few millimeters below the right leg of the bridge.There are many videos on YouTube showing you how to do it, and this is just one of them:...
prusaprinters
if you have higher print, you will spend more time with printer ?? ...
thingiverse
ADDITIONAL NOTES AND PRODUCT LINKS -------------------------------------------------------------------- ***BUILD VOLUME Z HEIGHT REMAINS INTACT*** One other note on the extra enclosure height needed to accommodate a B1: The B1's advertised build...
prusaprinters
Use the other back bushing to fill the unused hole on the other side.ADDITIONAL NOTES AND PRODUCT LINKSBUILD VOLUME Z HEIGHT REMAINS INTACTOne other note on the extra enclosure height needed to accommodate a B1: The B1's advertised build volume...
cgtrader
Name: Light_Bridge_Leader\nVersion: Alpha_11\nPreview: Enabled_by_Default\nUnits: Metric_Measures\nDimension: Five_Foot_Nine_inches_by_Eighteen_Inches_by_Three_Hundred_SevenpointSixFive\nGeometric_Parts:...
thingiverse
First, do a manual X, Y and Z adjustment and see how the carriage moves. If everything looks normal heat up the extruder to printing temps and feed in the filament using the load menu. If everything goes well it will now extrude from the nozzle. ...
thingiverse
First, do a manual X, Y and Z adjustment and see how the carriage moves. If everything looks normal heat up the extruder to printing temps and feed in the filament using the load menu. If everything goes well it will now extrude from the nozzle. ...
prusaprinters
I found a lot of inspiration and I have remixed a lot of designs that I found online, but at the same time I designed a large portion of models, so I will try to provide as much references as possible in this description. My main goal with this...
thingiverse
Thread the assembled carriage holders into the rails and rods of the Z-axis. 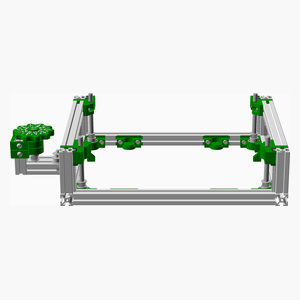 <span></span> ...
prusaprinters
The wires should be long enough to keep the bluetooh remote controller on the desk when the print head goes (on Z -Axis) upto the height of the model printed (ie max 250mm for Ender 3). So approx. 40cm wire length will be sufficient).</p>...
prusaprinters
If you have a more friction resilient plastic available this part especially will benefit from it.QualityRandomise the z-seam on the rollers, main drive axel and spindle, this helps prevent noise and vibration.Layer heightI printed the cam and tooth...
thingiverse
Este ejemplo asocia el código RF XXXXXX al registro 0 (movimiento de cabeza y sonido de R2D2) rf0 XXXXXX Estos son los registros disponibles: rf0 - Sonido R2D2 rf1 - Rueda Izquierda rf2 - Rueda derecha rf3 - Ambas ruedas rf4 - Melodía 1 rf5 -...
thingiverse
They're both 2 mm in Z height. One has no name and no background and the other has no name and no line under the name with a 0.4 mm background. ---- **Running the Customizer** When last checked, the Thingiverse customizer works only on the...
sketchfab
In the Transform panel, click on the "Location" tab and set the X-coordinate to -50 mm, the Y-coordinate to 0 mm, and the Z-coordinate to 0 mm. Next, go to the Edit Mode and select all vertices by pressing Ctrl+A. Then, press F2 to open the Mesh tab...
thingiverse
First, do a manual X, Y and Z adjustment and see how the carriage moves. If everything looks normal heat up the extruder to printing temps and feed in the filament using the load menu. If everything goes well it will now extrude from the nozzle. ...
thingiverse
First, do a manual X, Y and Z adjustment and see how the carriage moves. If everything looks normal heat up the extruder to printing temps and feed in the filament using the load menu. If everything goes well it will now extrude from the nozzle. ...
prusaprinters
I recommend raising the Z-axis toward the top before starting this procedure so you have ample room to work.Remove the print fan (tuck it between the X-axis belt and bottom bar).Remove the SuperPINDA (lay it over the top X-axis bar or over the X-axis...
prusaprinters
First, do a manual X, Y and Z adjustment and see how the carriage moves. If everything looks normal heat up the extruder to printing temps and feed in the filament using the load menu. If everything goes well it will now extrude from the nozzle.Level...