akm rear sight 3d models
65326 3d models found related to akm rear sight.
thingiverse
Fully assemble the torque gears assembly and sandwiche it together with the front and rear mount plates. Don't worry about allignment of the gears just yet, the main gear is quite sloppy until it's seated on the limiter. 9. Slide the torque...
gambody
Gatling cannon at the front of the carrier is poseable, as well as the roof turret, that it is mounted on a track to run down the rear of the APC for you to display the vehicle in a variety of scenarios. The windows on the driver compartment...
gambody
The 3D printing model's chosen scale is 1:8 for the FFF/FDM version;- When printed the Chevrolet Impala SS 1967 will stand 180 mm tall, 257 mm wide, 677 mm deep;Suspension:- The authentic active suspension of the model's front and rear axles...
prusaprinters
Klipper can power down most of the printer (fans, lights & motherboard) once the print is complete.I don't envisage shutting the Pi down unless the rear power switch is pressed. To accomplish this I've bought an <a...
thingiverse
The rear vertical Z rail support extrusion (500mm) is centered on the back frame rails, equal distance between the two rear corners. ####**Z Drive** [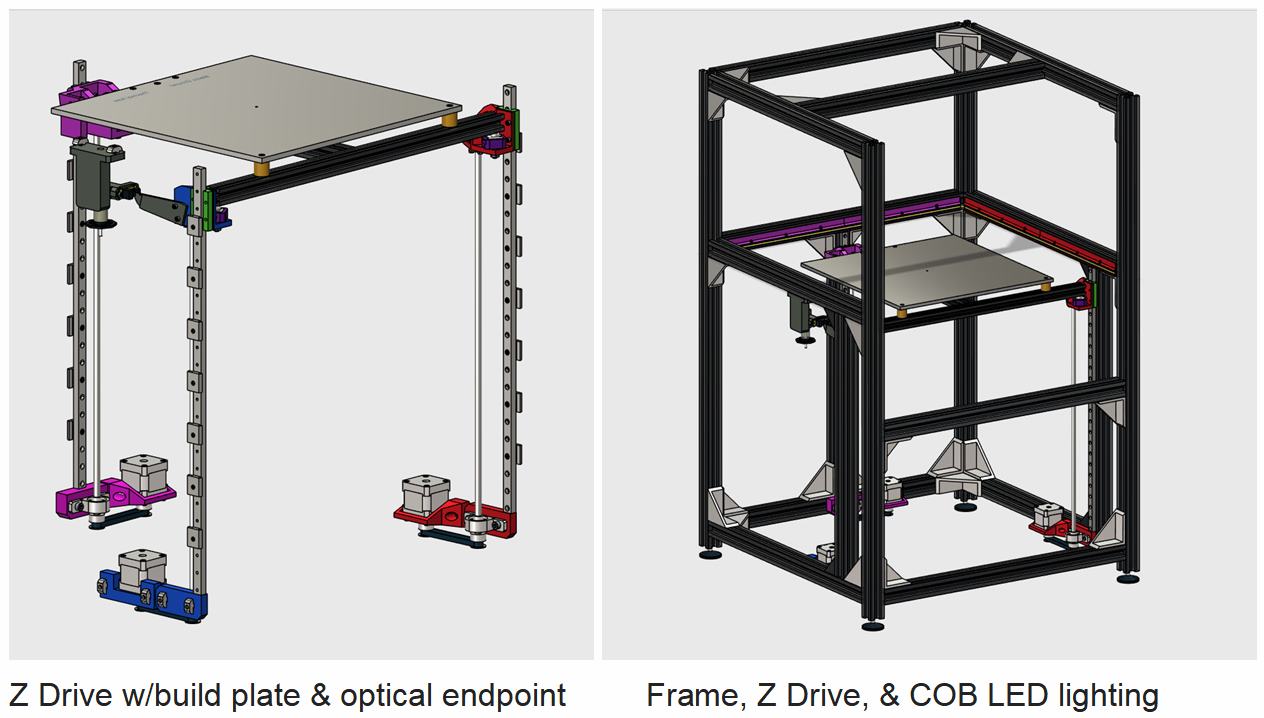](https://postimg.cc/QKs7nywc) ...
gambody
its thruster nozzles, entry hatch, interior compartments, landing feet, TARS support robot, rear venting panel, etc. are provided as separate STL files. The windows on the upper fuselage are also provided as 22 separate files for you to print them...
thingiverse
As I see it (without some smoke tests to be sure), the major airflow is from front fan to rear fan across the drivers. A secondary air flow will move from the vents across the board to the exhaust (partially driven by the suction the primary airflow...
gambody
its rear hatchway, engine thrusters, crew seats, reaction control jets, glide wings, etc. are provided as separate STL files. The windows on the viewports are also provided as separate files for you to print them using transparent filament or access...
prusaprinters
Modified settings: PrusaSlicer > Print Settings > 0.20 QUALITY MK3 > Layers and perimeters• "Ensure vertical shell thickness: disabled" - I had problems with thin 45° hanging angles when it was enabled.• "Perimeters: 6".• Seam position: Rear - I...
thingiverse
Sight where my weather station reports to is http://shermluge.xyz/wx This is still very much a work in progress but has been collecting data now since Dec 13 2017. Over 17,000 records. The website is still very rough, I've hard coded everything, even...
prusaprinters
Mount the front to the bottom using 4 M3*10 screws. Mount the jack to the bottom rear and lock it using the "Buchsenhalter" (sorry, forgot to translate it) to the bottom. Use 2 M3*8 screws.</p> <p>Solder 5 cables to the gesture sensor board, but do...
cults3d
AM8, Creality and Other 2020 Series Printer Rear or Side Spool Holder 2020 Series Extruder Mounting Clamp 8mm Frame or 2020 Bowden Inlet with Filament Sensor SKR 1.3 Multi-Mount! Fits 92 or 80mm Fan 2020 Series Frame Raspberry Pi 2 & 3 Case Mount...
cults3d
AM8, Creality and Other 2020 Series Printer Rear or Side Spool Holder 2020 Series Extruder Mounting Clamp 8mm Frame or 2020 Bowden Inlet with Filament Sensor SKR 1.3 Multi-Mount! Fits 92 or 80mm Fan 2020 Series Frame Raspberry Pi 2 & 3 Case Mount...
thingiverse
On the morning of 25 June 1941, the same KV tank was further engaged by German tanks from the woodland while an 88mm anti-tank gun targeted it from the rear. Of several shots fired, only two managed to penetrate the KV tank. The KV tank resisted and...
thingiverse
The bottom pieces come with various button hole layouts for start, select, home, turbo, L3, R3, TP and a mounting hole on the rear for a Neutrik NAUSB-W A/B USB Feed-Through adapter. Also included are joystick spacers so you can set the stick to your...
cgtrader
The default tolerance on the main bearing in Hull rear was slightly decreased for a tighter fit. After a discussion with Justin Wombwell, a tolerance mod for tighter tolerances on both seals and both bearings was added into the MODS folder. Also,...
prusaprinters
This thing allows mounting a BIQU-H2 extruder to a Sovol SV-01 original gantry plate with dual rear-mounted part cooling fans and an integrated BLTouch mount. I created this because I found when I installed the excellent Hero Yourself kit by...
prusaprinters
Moved rear bearing to sandwich the MK8 drive gear better. Updated Pulley Cage .stl to extend to the bottom and rest against Top Frame to prevent bowing/bending of Top Frame when belt is under tension. Updated Top Frame .stl to include a bottom M3 nut...
prusaprinters
UPDATE: 20.04.2022adapterplate (new design) for model C Hello, we would like to introduce you to our stealthburner conversion mod. At this time it works only with the klipper Firmware. The use with “Marlin” is planned later and will be...
cults3d
Fit the rear bracket, you will need T-M3 nuts, M3 screws to anchor it to the profile, and some flange, you will have to put all the cables already tucked into the trough, previously anchoring the first link to the piece with M3 screws and nuts. ...
prusaprinters
The assembly is tuned for installation in the printer so getting them to run outside of the box is a bit nuanced. Install fan and converter into fan box1) Starting with the assembled receiver, converter, and fans, slot the fans into the fan box such...
cults3d
Overhangs at the rear and right will still be cooled less effectively because the air cannot reach their undersides. One way to work around this is to print extra walls behind such overhangs to reflect the airflow back towards them. In most cases...
thingiverse
> 2 pieces PCA 9685 (front and rear for a total of 8 pieces 4mm RGB Led as vehicle lighting and control of the cruise control) [Amazon-Link] > 4 pieces HC-SR04 ultrasonic sensors [Amazon-Link] > 1 piece PN532 NFC/ RFID Reader [Amazon-Link] > 4...
myminifactory
The only warning shot that was fired tore through The Serenity’s rear, Samira’s quarters, and to her amusement, the onboard Bloodwell. Samira quickly ordered her crew to prepare for combat and sailed at full speed towards the dwarven ship. Upon...
prusaprinters
Make sure the Desiccant Cage is in a rear corner away from the Pneumatic Connectors. Fit the Clamp Thread onto the spindle of the Clamp Holder Base. It should turn easily but stop instantly.</p> <p>Choose a reel and pull out a length of filament...
prusaprinters
If one side is up the other side is down), and the nut traps in the leg_drive_disk will be on the side toward the frame. Turn the main drive gear to make sure that everything rotates without binding. Then tighten the M4 clamp nuts on the...
prusaprinters
Two parts that clamp together around a tube such as a table leg. Rear Hub.stl Front Plate-200.stlUse with the 200mm rail Front Plate-240.stl… Front Plate-280.stl… Front Plate-320.stl…Customization and the ModelI have provided a Fusion 360 file with...
prusaprinters
I'm even powering the RPi from 5v from a spare endstop pin off the Mini RAMBo - who has 3hrs to same-dayAmazon' yet another USB charger ? No metal fasteners needed (the MK2 comes with an extra 12mm M3 screw to replace the stock 10mm one as part of...
thingiverse
The major change in my design is the addition of a second set of connectors at the rear of the earcups, which allow the use of a removeable bridge cable. This means that the headphones can be used with either a split cable, without using a bridge...
cults3d
Reverses the screw and ball mount inline with the rear bumper. Remove frame-to-axle-backing. Under more than 15lbs pressure, it would separate. Will have to redo this concept. Do not use at this time. Added print guide ** UPDATED parts ** ...