3rd gen 4runner rear bumper 3d models
76928 3d models found related to 3rd gen 4runner rear bumper.
gambody
The 3D printing model's chosen scale is 1:8 for the FFF/FDM version;- When printed the Chevrolet Impala SS 1967 will stand 180 mm tall, 257 mm wide, 677 mm deep;Suspension:- The authentic active suspension of the model's front and rear axles...
thingiverse
The rear vertical Z rail support extrusion (500mm) is centered on the back frame rails, equal distance between the two rear corners. ####**Z Drive** [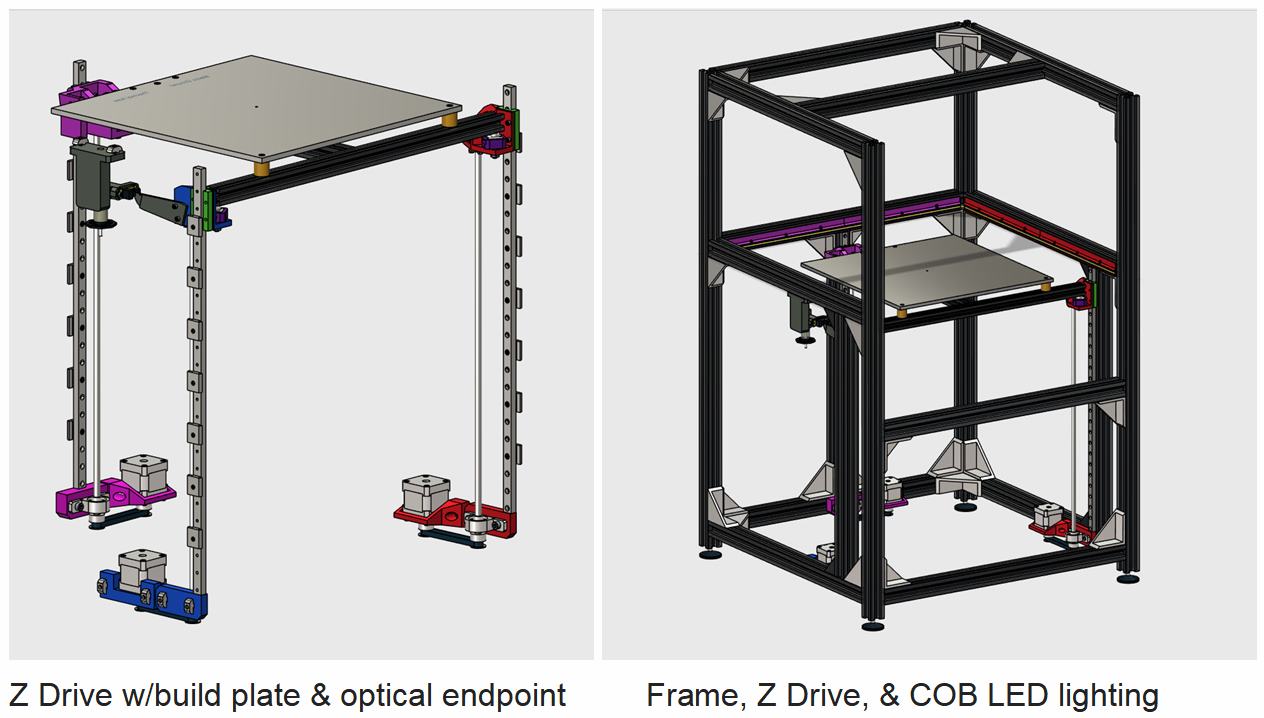](https://postimg.cc/QKs7nywc) ...
thingiverse
As I see it (without some smoke tests to be sure), the major airflow is from front fan to rear fan across the drivers. A secondary air flow will move from the vents across the board to the exhaust (partially driven by the suction the primary airflow...
thingiverse
Print with nut insert" /> Electronics Tools • Accessories Hand Tools Power Tools • Accessories <a...
thingiverse
Print with nut insert" /> Electronics Tools • Accessories Hand Tools Power Tools • Accessories <a href="https://www.thingiverse.com/thing:3837220"...
thingiverse
Print with nut insert" /> Electronics Tools • Accessories Hand Tools Power Tools • Accessories <a...
thingiverse
Print with nut insert" /> Electronics Tools • Accessories Hand Tools Power Tools • Accessories <a...
thingiverse
Print with nut insert" /> Electronics Tools • Accessories Hand Tools Power Tools • Accessories <a...
thingiverse
Print with nut insert" /> Electronics Tools • Accessories Hand Tools Power Tools • Accessories <a...
thingiverse
The print settings are as follows:General Settings:0.3mm first layer0.2mm layer heightSpecific Part - Inside - Lower:0.45mm for all layersColor Switching:Start with white filament for the first 2 layers (0.5mm)Switch to silver filament at the 3rd...
thingiverse
>For example, my 3rd grade child suggested the peaks near the center of the landing ellipse as 'ancient islands in the crater when it was a lake' & we discussed the impact of a change in water depth over time. ... * There is also the option to follow...
thingiverse
There are two holes on body's corners that shoiuld be drilled to 2 mm diameter and bumpers can be glued inside. Notice it on pictures, '22. 4x self-adhesive anti-slip pads (5-7 mm diameter), '23. 3x M3 brass knurled melt insert / nut (not really...
prusaprinters
It Works, I have test it!FeaturesSecured BaseFor me, the most valuable feature is the low profile “Dock” attachment, It properly secures the controller to the table so there is no need to hold it.Four holes to secure itPush in to click-lockPush down...
thingiverse
Knobs Collection for Bolt Hex head and Nut This Hex Bolt Handle Set ISO 4014-4017 M2.5-M10 Links to used components: ISO 4017 Bolts Nuts AB Glue Epoxy Super Glue 502 E8000 Strong Liquid Glue Links to used tools: Mini Wireless Grinder Polishers...
prusaprinters
Modified settings: PrusaSlicer > Print Settings > 0.20 QUALITY MK3 > Layers and perimeters• "Ensure vertical shell thickness: disabled" - I had problems with thin 45° hanging angles when it was enabled.• "Perimeters: 6".• Seam position: Rear - I...
prusaprinters
Two parts that clamp together around a tube such as a table leg. Rear Hub.stl Front Plate-200.stlUse with the 200mm rail Front Plate-240.stl… Front Plate-280.stl… Front Plate-320.stl…Customization and the ModelI have provided a Fusion 360 file with...
prusaprinters
(stay tuned) On the right side of the lack instead there is the drawer that contains the USB transformer and the connections of the electrical contacts and a second drawer that contains 1 raspberry 2 modules of 4 relays and 2 esp8266 boards For now I...
thingiverse
> 2 pieces PCA 9685 (front and rear for a total of 8 pieces 4mm RGB Led as vehicle lighting and control of the cruise control) [Amazon-Link] > 4 pieces HC-SR04 ultrasonic sensors [Amazon-Link] > 1 piece PN532 NFC/ RFID Reader [Amazon-Link] > 4...
prusaprinters
Remove the rear motor screws and it will pull out the front. I dropped the cable chain but the stock chain should mount to the top holes. I velcroed my cable rope to the rail 'hat' from my dual bowden gantry (<a...
prusaprinters
If one side is up the other side is down), and the nut traps in the leg_drive_disk will be on the side toward the frame. Turn the main drive gear to make sure that everything rotates without binding. Then tighten the M4 clamp nuts on the...
thingiverse
Please note that the code sets the print head to the rear corner of the print bed (Y changed to 220 for safety reasons). *Part 1: TESTING G-CODE MOVES* Filename: 'ejectmove.gcode' G28 ; home G90 ; Absolute positioning G0 X0 Y220 Z15 ; set...
thingiverse
This thing allows mounting a BIQU-H2 extruder to a Sovol SV-01 original gantry plate with dual rear-mounted part cooling fans and an integrated BLTouch mount. I created this because I found when I installed the excellent [Hero Yourself kit by...
prusaprinters
I'm even powering the RPi from 5v from a spare endstop pin off the Mini RAMBo - who has 3hrs to same-dayAmazon' yet another USB charger ? No metal fasteners needed (the MK2 comes with an extra 12mm M3 screw to replace the stock 10mm one as part of...
prusaprinters
Insert M3 Hex Nuts into FRAME into rear slot and insert screw from the front, screws 2 M3 x 16 SHCS. Do not tights yet, allow the TENSIONER to freely move between the side ribs.</p><p><strong>FINAL ASSEMBLING: We are almost done</strong></p><p>Insert...
myminifactory
The only warning shot that was fired tore through The Serenity’s rear, Samira’s quarters, and to her amusement, the onboard Bloodwell. Samira quickly ordered her crew to prepare for combat and sailed at full speed towards the dwarven ship. Upon...
prusaprinters
I used a router for that, but a jigsaw will do it tooput brush seal strip into the filament openingdepending who you want to feed all your cables inside the enclosure you can make a small cutout in the bottom rear corner. Feeding it through the base...
prusaprinters
Hi all,I'll start with listing all the parts, items and hardware you will need for this build:-5x 350x350x3mm acrylic panels (I got one acrylic mirror panel for the rear).-4x M3 ~20-40mm screws/bolts to attach the stand to the bottom plate.-optional:...
thingiverse
It turned out that the nuts that came out from the rear had a different diameter and therefore did not enter, so as I said with a bit and a bit of very light play by hand, if you need to enlarge it. For assembly there is little to say, the photos...
thingiverse
# Scaling/Sizing for your head The first thing to consider when scaling the size of the helmet to your head is whether you intend on printing the Leather Neck Cover for the Jaw and Rear of the helmet. On the in-game helmet, these parts would be...
grabcad
Ceiling and wall applications are mounted using the included adjustable swivel mount bracket found on the rear of the unit. Pendant applications are mounted from the ceiling and are suspended by rigid pipe via the 3/4" NPT hub on the back of the...