270 z 3d models
84023 3d models found related to 270 z.
prusaprinters
Kompletna lampa Led do akwarium morskiego lub słodkowodnego, jest to cały projekt lampy led w drugiej wersji V2 o mocy 350W z obudowa elektroniki oraz wszystkimi elementami, do lampy potrzebne są jeszcze:1 . Elementy ze sklepu Aquma:</p><ul><li><a...
thingiverse
26.) Replace z-axis endstop screw. 26a.) Remove endstop screw, located on left gantry. 26b.) Put M4x50mm screw in place of original, using original spring. (You may need a washer, depending on what kind of screw you used. 26c.) Screw down...
prusaprinters
You could use larger sheets of adhesive tape, however, they are a lot thicker @ 0.5mm (the 235mm glass does not include thermal adhesive tape)....
prusaprinters
The soundpost has to be placed vertically inside the violin (through the right f-hole), about a few millimeters below the right leg of the bridge.There are many videos on YouTube showing you how to do it, and this is just one of them:...
prusaprinters
Use the "snug" support type, honeycomb pattern, 0.1mm z-contact distance. Print with 0.15mm layer height, 3 perimeters, zero infill. The “ensure vertical shell thickness” setting should be <strong>disabled</strong> for lightest weight.</p><p>Set a...
prusaprinters
It isn't necessary to use a layer height finer than 0.2 mm, because none of the pieces have much detail along the z axis. Supports are not necessary, they have been modeled in where they are needed. I printed my calendar in PLA, but it should print...
prusaprinters
In case your ring does not stick well during print, try the original fidget ring instead.After printing, turn the ring a few times to make it spin better. Ring size conversion table:Ring inner diameter in mmUSACanadaUnited...
thingiverse
The wires should be long enough to keep the bluetooh remote controller on the desk when the print head goes (on Z -Axis) upto the height of the model printed (ie max 250mm for Ender 3). So approx. 40cm wire length will be sufficient). Optional: I...
prusaprinters
NOTES: Since the Gen2 handle has a longer socket than the original, the Alternative rods are slightly longer, to compensate.The Gen2 handle has a D-shaped hole, so you need to think about where to place the Z-seam at slicing time, to ensure that the...
prusaprinters
if you have higher print, you will spend more time with printer ?? ...
thingiverse
First, do a manual X, Y and Z adjustment and see how the carriage moves. If everything looks normal heat up the extruder to printing temps and feed in the filament using the load menu. If everything goes well it will now extrude from the nozzle. ...
prusaprinters
There are also useful coat hangers and finger toys.There is functional furniture as well:Or check out the 1250 keychain name tags:Print instructionsYou can print it without any support, and it prints very fast.Standard settings will be fine, like...
prusaprinters
If you have a more friction resilient plastic available this part especially will benefit from it.QualityRandomise the z-seam on the rollers, main drive axel and spindle, this helps prevent noise and vibration.Layer heightI printed the cam and tooth...
prusaprinters
I found a lot of inspiration and I have remixed a lot of designs that I found online, but at the same time I designed a large portion of models, so I will try to provide as much references as possible in this description. My main goal with this...
sketchfab
In the Transform panel, click on the "Location" tab and set the X-coordinate to -50 mm, the Y-coordinate to 0 mm, and the Z-coordinate to 0 mm. Next, go to the Edit Mode and select all vertices by pressing Ctrl+A. Then, press F2 to open the Mesh tab...
prusaprinters
First, do a manual X, Y and Z adjustment and see how the carriage moves. If everything looks normal heat up the extruder to printing temps and feed in the filament using the load menu. If everything goes well it will now extrude from the nozzle.Level...
thingiverse
First, do a manual X, Y and Z adjustment and see how the carriage moves. If everything looks normal heat up the extruder to printing temps and feed in the filament using the load menu. If everything goes well it will now extrude from the nozzle. ...
thingiverse
First, do a manual X, Y and Z adjustment and see how the carriage moves. If everything looks normal heat up the extruder to printing temps and feed in the filament using the load menu. If everything goes well it will now extrude from the nozzle. ...
thingiverse
First, do a manual X, Y and Z adjustment and see how the carriage moves. If everything looks normal heat up the extruder to printing temps and feed in the filament using the load menu. If everything goes well it will now extrude from the nozzle. ...
thingiverse
Dans le domaine de vol de l'avion, le turboréacteur est sollicité par des accélérations suivant l'axe longitudinal (X), qui ne fait pas l'objet d'une limitation particulière, et l'axe vertical (Z), pour lequel le motoriste impose une limitation en...
prusaprinters
(if the gap is 1.2mm, you will read 06 for 0.6mm on both sides, just to be clear ;) )In your slicing program, scale the washer (Z-axis only) to the desired thickness and print 4. I would suggest TPU or TPE as it will function as a vibration dampener....
thingiverse
First, do a manual X, Y and Z adjustment and see how the carriage moves. If everything looks normal heat up the extruder to printing temps and feed in the filament using the load menu. If everything goes well it will now extrude from the nozzle. ...
thingiverse
They're both 2 mm in Z height. One has no name and no background and the other has no name and no line under the name with a 0.4 mm background. ---- **Running the Customizer** When last checked, the Thingiverse customizer works only on the...
thingiverse
Thread the assembled carriage holders into the rails and rods of the Z-axis. 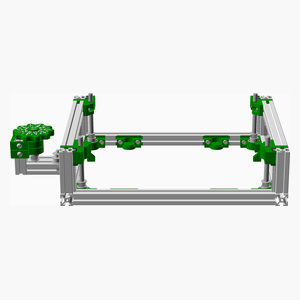 <span></span> ...
thingiverse
Este ejemplo asocia el código RF XXXXXX al registro 0 (movimiento de cabeza y sonido de R2D2) rf0 XXXXXX Estos son los registros disponibles: rf0 - Sonido R2D2 rf1 - Rueda Izquierda rf2 - Rueda derecha rf3 - Ambas ruedas rf4 - Melodía 1 rf5 -...
prusaprinters
These are hosted externally.Ryobi to Makita Adapter:Wire Spool Holder:---------------------------------------------------------------------------------------------------------Edit: I guess I should have added some short instructions on how the gif's...
prusaprinters
You could also use a piece of Stripboard to just use oneground pin of the Raspberry Pi and connect all ground wires of the buttons just to this Stripboard.If you want to use the exact same configuration forRetrogame you can use the following...
prusaprinters
First, do a manual X, Y and Z adjustment and see how the carriage moves. If everything looks normal heat up the extruder to printing temps and feed in the filament using the load menu. If everything goes well it will now extrude from the nozzle.Level...
thingiverse
(rotate 45 degrees in Z axis, enable supports)Cabinet_Light_Bar_Plug.stl is for plugging the two holes near the top left on the back of the cabinet. The original HF light is useless, and is generally replaced with LED lights or halogen bulbs. You'll...
prusaprinters
The wires should be long enough to keep the bluetooh remote controller on the desk when the print head goes (on Z -Axis) upto the height of the model printed (ie max 250mm for Ender 3). So approx. 40cm wire length will be sufficient).</p>...