2013 f150 rear seat latch 3d models
147095 3d models found related to 2013 f150 rear seat latch.
prusaprinters
holder 007 skadis mounting plate *added due to user request* 008 flush cutters holder 009 Pliers holderthe ones that came with your prusa 010 IPA Spraybottle holderfor small bottles with a diameter of 31mm Assembly low friction spool holder...
cults3d
Mount the fan of the original heatsink or one that you want by passing all the cables through the rear, through the channel that has the base. Remember to insert a wire for the 4-wire nema motor usually comes in the packs if you didn't need at...
thingiverse
... -The brackets used to mount the I/O components on the rear of the cabinet and elserwhere were designed around that particular brand and style. You may need to load this into an STL editing tool and make changes if you can't find that brand of part.
prusaprinters
This rear mounted design is the easiest to install and has the best cable management. Basically it just adds another zip-tie slot, and a few bumps that help push the endoscope to the correct angle. I'm sure someone can come up with a better design...
prusaprinters
... carriages. Align the assembled front and rear bogies and wheelsets with the M3 pins below the locomotive; the 4-wheel trucks should be able to freely rotate as well as shift laterally a few mm. ...Throw the switch and you're ready to ride!</p>
prusaprinters
TL;DR first: Welcome to my Overhaul of the Creality Ender 2! Im starting here with version V2 (V1 is only in one picture; there was too much wrong with that), which comes in 2 iterations/stages: ++++++++ Stage 1: ++++++++ changing out the Heatbed to...
prusaprinters
Now you can mount the lens to the end of the extension tube.Connect the shutter release cable adapter to the camera's release port, and then to the 3.5mm jack at the rear of the trigger grip.I'd strongly recommend keeping your camera mounted at all...
prusaprinters
No supports necessary!Assembly:Attach the V mount accessory plate from the SmallRig kit to the rear of the carrier using M3 x 6 flat head screwsIf using Velcro or tape to secure the battery, cut a piece to fit the bottom of the carrier and apply it;...
thingiverse
-If you still have the stock glass bed, the rear clips may collide with the cooling ducts during printing and bed levelling. I pulled them off the back and moved them to the side. I have a magnetic build plate on the way so it wont be an issue...
thingiverse
As I see it (without some smoke tests to be sure), the major airflow is from front fan to rear fan across the drivers. A secondary air flow will move from the vents across the board to the exhaust (partially driven by the suction the primary airflow...
thingiverse
The rear vertical Z rail support extrusion (500mm) is centered on the back frame rails, equal distance between the two rear corners. ####**Z Drive** [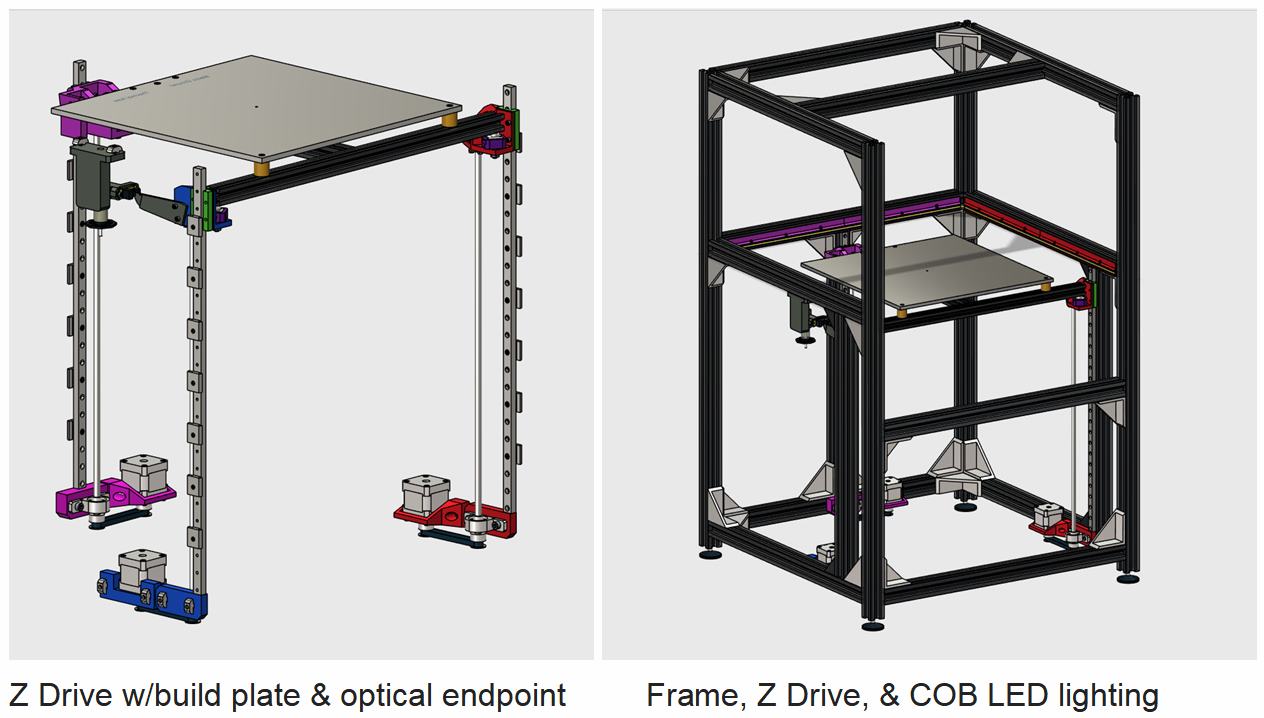](https://postimg.cc/QKs7nywc) ...
gambody
The 3D printing model's chosen scale is 1:8 for the FFF/FDM version;- When printed the Chevrolet Impala SS 1967 will stand 180 mm tall, 257 mm wide, 677 mm deep;Suspension:- The authentic active suspension of the model's front and rear axles...
gambody
Gatling cannon at the front of the carrier is poseable, as well as the roof turret, that it is mounted on a track to run down the rear of the APC for you to display the vehicle in a variety of scenarios. The windows on the driver compartment...
prusaprinters
(a 5mm Brim may be needed for the AXLE and RIMS as they print much taller than they are wide) -- COLOR CHANGES Specific Layer and Height in mm for each color change on each part, (NOTE using PrusaSlicer, Changes occur BEFORE the selected layer...
thingiverse
After about 20-30 minutes I had the bearing within ¼ inch of being fully seated. i cleaned the sanded aluminum tube with alcohol after each sanding volley. Before the final installation of the bearing to its full down position I rolled an o-ring ...
prusaprinters
There's a slight chamfer at the start of the pocket to assist in getting your firesteel rod to seat. I'm happy to upload the Fusion 360 raw file, but I'd like to first illicit feedback so there isn't a dozen remixes that confuse folks as to which one...
cults3d
Apply some hot glue to the capacitor groove and seat the capacitor -- this will keep the radio module in place. Run the radio ground wire, LED VCC, ground, and data wires through the wire hold-downs. Run the sensor and power lines through the wire...
prusaprinters
This will make sure that the washer seats horizontally and meets the screw shoulder squarely. Soldering wires I used a brass washer so soldering was no problem, I did make a small notch in the outer edge for the wire. You can just as easily cut the...
prusaprinters
Ideally the spring is ½ compressed.insert M3 bolt from outshell side, through the slit in outershell, into the stalkplace washer onto the m3 bolt inside the stalk (check with flashlight that washer is properly seatedplace spring onto m3 boltPlace...
thingiverse
... that is 2 pieces and hollow to save on plastic. 10/9/2022 - Narrowed the linear bearing seats and widened the rod through-holes on the slide top and bottoms (it seems to be rubbing when off-center pressure was applied) Happy flying! ...
prusaprinters
Push together snuggly, check that all ptfe ends are well seated. On the EasyCut, ptfe tubing will cover the bottom of the small inspection hole. On the filament side, the ptfe tube extends 1mm into the cutting gap. Modify the Klipper printer.cfg...
cults3d
He would lower a half-shell of beryllium, called the tamper, over the core, stopping just before it was snugly seated. The tamper would reflect back the neutrons that were shooting off the plutonium, jump-starting a weak and short-lived nuclear chain...
thingiverse
The lid in blue should be printed with support for the M3 nuts and the pins on which the springs are pushed so that the nuts can be firmly seated in the lid or glued in and the feathers don't pop off in the finished lap after removing the support. ...
prusaprinters
Components must be printed at 0,2 mm layer height and 15-20% infillRequired ComponentsPrinted pieces (check each model).97 Neodymium magnets N30, D5xH3 mm (+ 12 optional magnets for cover).Cyanoacrylate (super glue).Warning 1: every file (STL, 3MF,...
prusaprinters
The bit-holders are a friction fit - push them all the way in by squeezing from opposite sides of the wheel; I also used a wood block to help gently seat the holders into place. If you are screw-mounting the assembly, first install four of the...
thingiverse
Assemble the circuit as best you can to fit in the top-right most segment, I did it, you can too, or split them between segments if you have to, but don't forget to route the wires correctly through the wire paths so your sleeve will seat all the...
cults3d
He would lower a half-shell of beryllium, called the tamper, over the core, stopping just before it was snugly seated. The tamper would reflect back the neutrons that were shooting off the plutonium, jump-starting a weak and short-lived nuclear chain...
prusaprinters
Once the fan is seated you can push them all back together.Run the cord through the two notches in the base piece to help hold it in place. ... Depending on the surface you place it on you may need to trim a small part of the filter cardboard...
prusaprinters
Push it down against the heater block and reinstall the blue clip (or screw cap for the MicroSwiss) to hold the PTFE tube in place. 73 (or 63) mm is the exact distance between the heater block and the seat for the Bowden tube inside the Orbiter...
thingiverse
Press together as far as you can, the Center should stop at a ridge in the Bottom when fully seated. Either glue once fitted, or pull apart, add glue, and press back together.If the fit is too tight, print the “Loose Fit” version of the Center piece...